Thursday, 2 August 2012
Check Drive Letter in Use - VBScript
Dim Wdrive
Set FileSystemObject = wscript.CreateObject("scripting.FileSystemObject")
Set Drives = FileSystemObject.Drives 'Create a drives collection
For Each DiskDrive in Drives
DriveLetter = DiskDrive.DriveLetter
If DriveLetter = W Then
Wdrive = True
wscript.echo "W Mapped"
End If
Next
Add Lines to File - VBSCript
Const ForReading = 1, ForWriting = 2, ForAppending = 8
Set objFSO = CreateObject("Scripting.FileSystemObject")
Set objTextFile = objFSO.OpenTextFile("C:\oracle\ora81\network\admin\tnsnames.ora", ForReading)
Do Until objTextFile.AtEndOfStream
strLine = objTextFile.ReadLine
intFailure = InStr(strLine, "LINE 1")
intFailure2 = InStr(strLine, "LINE 2")
intfailure3 = InStr(strLine, "LINE 3")
intfailure4 = InStr(strLine, "LINE 4")
intfailure5 = InStr(strLine, "LINE 5")
intfailure6 = InStr(strLine, "LINE 6")
intfailure7 = InStr(strLine, "LINE 7")
If intFailure > 0 or intFailure2 > 0 or intFailure3 > 0 or intFailure4 > 0 or intFailure5 > 0 or intFailure6 > 0 intFailure7 > 0 Then
strNewText = strNewText & strLine & vbCrLf
Else
strOtherNewText = strOtherNewText & strLine & vbCrLf
End If
Loop
objTextFile.Close
Set objTextFile = objFSO.OpenTextFile("C:\oracle\ora81\network\admin\tnsnames.ora", ForWriting, True)
objTextFile.Write(strOtherNewText)
objTextFile.Close
'****************************************************************************************************************
dim filesys, filetxt
Set filesys = CreateObject("Scripting.FileSystemObject")
Set filetxt = filesys.OpenTextFile("C:\oracle\ora81\network\admin\tnsnames.ora", ForAppending, True)
filetxt.WriteLine("LINE 1")
filetxt.WriteLine("LINE 2")
filetxt.WriteLine("LINE 3")
filetxt.WriteLine("LINE 4")
filetxt.WriteLine("LINE 5")
filetxt.WriteLine("LINE 6")
filetxt.WriteLine("LINE 7")
filetxt.Close
Set Shortcut Icon - VBScript
Set objShell = WScript.CreateObject("WScript.Shell")
strDesktopFld = objShell.SpecialFolders("Desktop")
Set objURLShortcut = objShell.CreateShortcut(strDesktopFld & "\blah.url")
objURLShortcut.TargetPath = "http://www.blah.com"
objURLShortcut.IconLocation "\\server\share\icon.ico
objURLShortcut.Save
Wednesday, 1 August 2012
Adding Pre-Requisite along with Setup - Installshield
In order to check and install a pre-requisite along with setup. Follow the steps:
1. Goto Application Data -> Redistributables in Installation Designer
2. Select the pre-requisite that needs to be added to setup installation.
3. Select when pre-requisite installation should happen incase if its not found.

1. Goto Application Data -> Redistributables in Installation Designer
2. Select the pre-requisite that needs to be added to setup installation.
3. Select when pre-requisite installation should happen incase if its not found.

Tuesday, 31 July 2012
Creation of .PRQ Files - Installshield
This post describes creation of .PRQ files which can be added to ISM during creation of installers.
Prerequisite editor can be launched directly through "Installshield Prerequisite Editor" shortcut OR from ISM.

Pre-requisite editor launches as shown below, Unique Identifer will be displayed automatically

Under the Conditions section, specify the condition to be evaluated for the pre-requisite to run. Depending upon the condition selected Properties get changed

In "Files to Include" section, specify the pre-reqs files which are to be executed.

In "Applications to Run" section, select the application from drop down list and provide command line arguments to be used while installing the pre-req.

in "Behavior" section, choose the options which are required.

In "Dependencies" section, specify if this installation has any other pre-requisites.

Once all the inputs are provided, Go To File-> SaveAs and save the .PRQ file in desired location.
Thursday, 26 July 2012
Installshield 2012 Suite - Chaining Application Installations
Installshield has introduced new feature in v2012 i.e., to chain application installations. EXEs or MSIs can be clubbed together as a suite which makes it easier to perform installation of applications which contain more than one MSI/EXE.
1. Launch Installshield and select "Create a new project"
2. Select "Suite Project"
3. In Packages section, select the installer that needs to be run

4. Select the MSI that needs to be added to suite

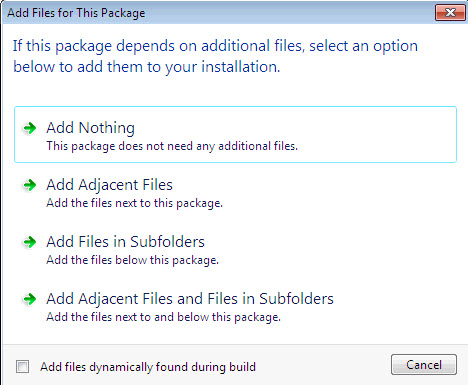
5. Select the appropriate option in the following screen depending upon the application.

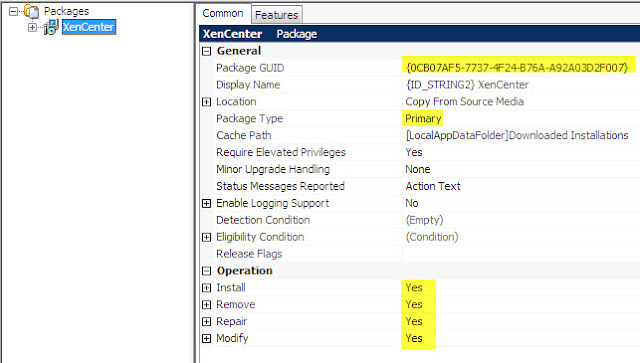
6. Once the MSI is imported into suite, all the parameters will be populated automatically as highlighted in the below snapshot:
7. In the same procedure add 2nd MSI

8. Once the sequencing of installers is completed, Go to Releases and Build the suite to generate the output

9. Output Setup.exe acts like a bootstapper which can be used to install the installers that were added inside Installshield Suite.
Steps to create a Installshield Suite:
1. Launch Installshield and select "Create a new project"
2. Select "Suite Project"
3. In Packages section, select the installer that needs to be run

4. Select the MSI that needs to be added to suite

5. Select the appropriate option in the following screen depending upon the application.
6. Once the MSI is imported into suite, all the parameters will be populated automatically as highlighted in the below snapshot:

7. In the same procedure add 2nd MSI

8. Once the sequencing of installers is completed, Go to Releases and Build the suite to generate the output

9. Output Setup.exe acts like a bootstapper which can be used to install the installers that were added inside Installshield Suite.
Add Scheduled Task to MSI - Installshield 2012 Spring Features
New Feature in Installshield 2012 Spring is creation of Scheduled Task.
Within the MSI its now possible to create a scheduled tasks which will be installed along with application and runs depending upon the schedule parameters set.
Please find detailed snapshot:
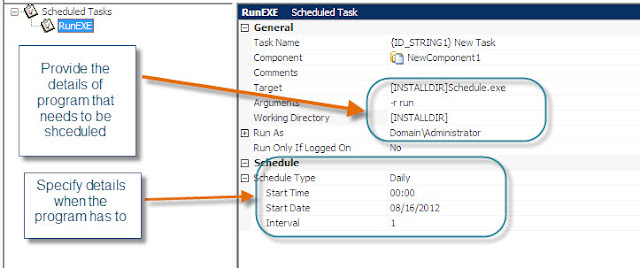
Within the MSI its now possible to create a scheduled tasks which will be installed along with application and runs depending upon the schedule parameters set.
Please find detailed snapshot:

Subscribe to:
Posts (Atom)